Pitta bread

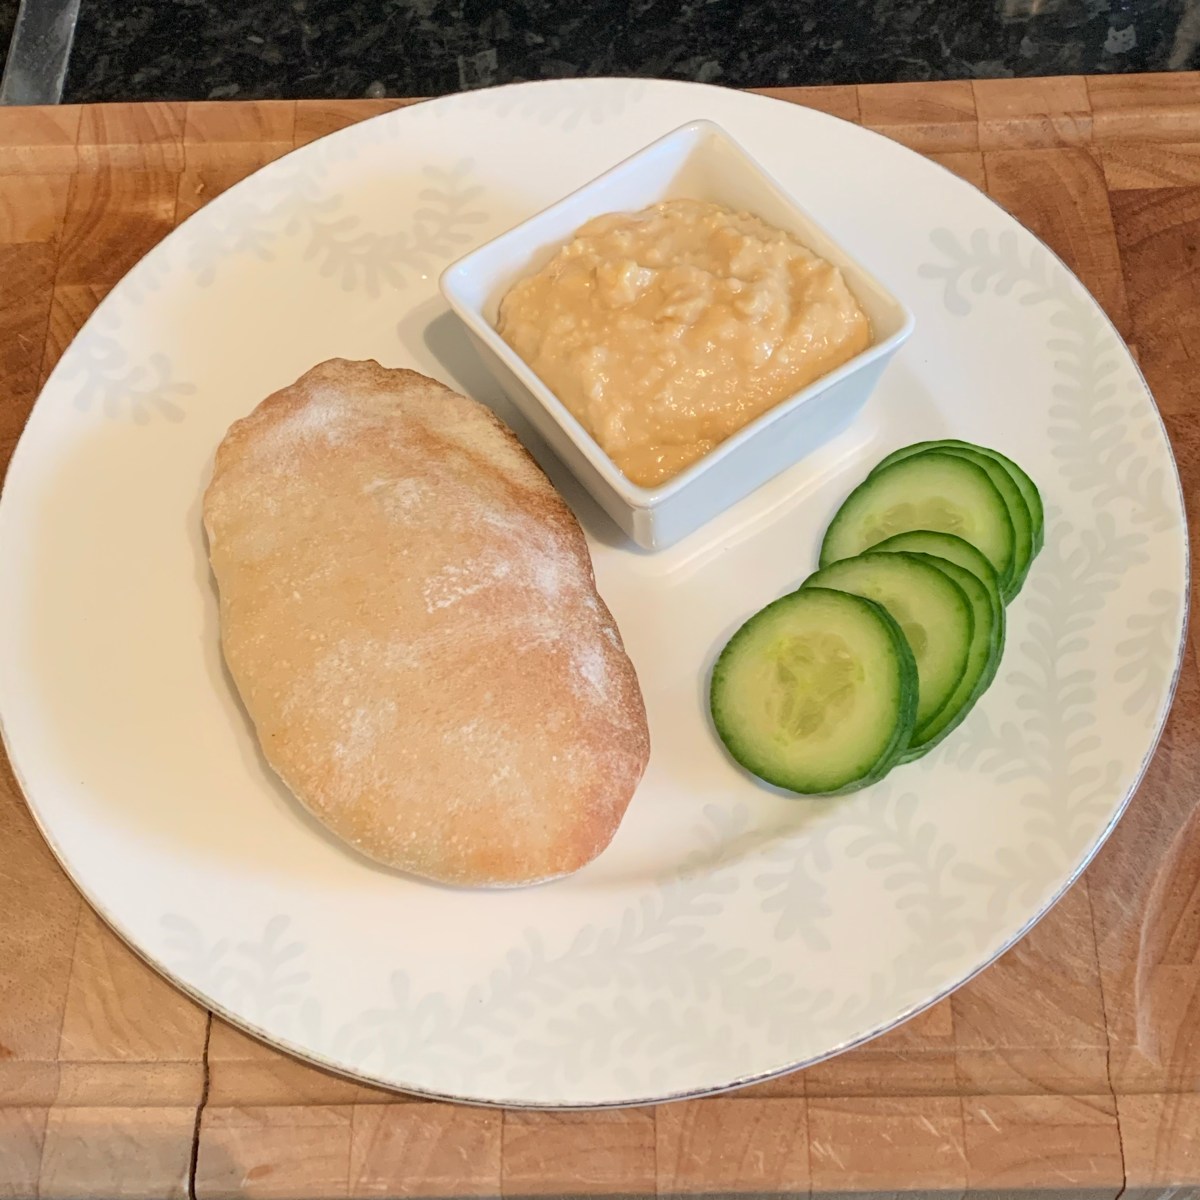
I’ve been wanting pitta bread and hummus (Click here for homemade hummus recipe) for a couple of days now. I often wake up much earlier than my husband on the weekends, so I’ve decided to make these today as a Sunday breakfast.

makes 8

350g strong white flour
1 1/2 tsp salt
1 tsp sugar
1 tsp dried yeast
1 tbsp olive oil
200ml lukewarm water

1. Mix all the dry ingredients together in a mixing bowl. Put the water and oil in another bowl / jug. Pour the liquid onto the dry ingredients, then knead for 10 minutes. You can do this by hand, or use a food processor. I use the machine, on strength 1.

img_1522

2. After kneading time, cover and leave to rise in a warm place for an hour. I usually use a metal mixing bowl, put some hot water at the bottom of the sink (about 2-3 cm / an inch), then place the bowl in the water.

img_1524

3. Place the rested dough on a slightly floured surface, and cut into 8 pieces. Shape the pieces into balls, then cover with oiled cling film and leave to rest for 10 minutes.

img_1525

4. After the resting time, flatten the balls with floured hands. Using a rolling pin, roll to oval shape flat breads, about 15cm (6 inches) long and 5mm (1/4 inch) thick. Cover, and leave to rise for 30 minutes.

img_1526

5. Preheat the oven to 220°C (fan) / 430°F. Bake the breads for about 5-7 minutes. Remove from the oven and cool on a wire rack, then enjoy!

img_1527

img_1528

Apple pie

There are probably as many apple pie recipes, or variations of recipes, for this favourite dessert of many nations, than there are chefs and home cooks. The below recipe is one I like. Some people prefer more filling to pastry, some like more pastry. I think this recipe gives you enough of both.

Pastry
225g butter, room temperature

50g caster sugar, plus a little bit extra for sprinkling on top
2 eggs
350g plain flour
~~~~~
Filling

1 kg Bramley apples
150g caster sugar
1 tsp cinnamon
3 tbsp plain flour

1. Prepare the pastry first. Beat the butter and sugar together in a bowl until mixed. Add one whole egg, and one yolk, and save the remaining egg white for later. Beat together for one minute.The mixture will look a little bit like scrambed eggs at this point. Then add the flour little by little. Tip the dough onto floured surface, and finish working the dough by hand. Form the dough into a ball, wrap in cling film and chill in the fridge for 45 minutes.

img_6403

2. Whilst the dough is in the fridge, prepare the apple filling. Quarter, core, peel and slice the apples. You want the slices to be quite thin, about 5mm thickness. Lay on a baking paper, and cover with paper towels. Let dry for about 30 minutes.

3. Mix the sugar, cinnamon and flour for the filling. Use big enough bowl, to be able to fit the apple slices later.

img_6410

4. Heat the oven to 170°C / 340°F. Cut 2/3 of the dough for the base, leaving the remaining third for the lid wrapped. Roll the base out, to be big enough to cover the pie tin, with a slight overhang. It may be a good idea to place the dough between two non-stick baking paper sheets when rolling it. Place into the tin, and roll out the lid.

5. Pat the apples dry, and put into the bowl with the sugar – cinnamon mix, and mix together well, so that all the apple slices are coated with the mixture. Tip it all onto the pie tin. Wet the pastry rim with water, using your fingers. This will help the lid to stick. Place the lid over the apples, and press edges together with the base. Stab 5 slashed with a sharp knife, and brush with beaten egg white. Sprinle with some more sugar, and bake for about 45 minutes.

6. Once baked and golden brown, let rest for about 10 minutes.


Crêpes

Crêpes are a good, easy choice when you feel like you would like to treat yourself (or your family) to a sweet breakfast. All ingredients are part of most households’ basic cupboard, so this doesn’t require much pre-planning. And why not make a big enough batter to have some left over, to use for savoury galettes later?

makes 8 large crêpes
2 eggs
600 ml milk
250 ml basic wheat flour
1/2 tsp salt
2 tsp sugar
~ tbsp butter, melted, + extra for frying

1. Slightly whisk the eggs so that the yolks and the whites are combined together. Whisk in half of the milk. Then add the flour little by little, whisking in until all the flour has been added and the mixture is slightly thick batter. Mix rest of the milk into the batter, then add salt, sugar and melted butter, and whisk just to mix everything together.

2. Let the batter rest for about 15 minutes.

3. Give the batter a slight stir. For each crêpe, use a small piece of butter for frying. Melt the butter in a frying pan, and add a ladle (about 100ml) of batter into the pan. I have a large frying pan, and this amount works well. If your pan is smaller, less might be better.

4. The first crêpe tends to take slightly longer to fry, than the rest of them, but generally it will take around 3-4 minutes to cook the first side, and around one minute for the second side, depending on heat. I use medium heat, and fry the first side one setting higher than the second side. When cooking the first side, when the batter has become firm on top, and the crêpe has normally gotten holes in the batter, you can start checking the underside to see whether it’s browned enough. Once the underside is nice golden colour, flip the crêpe over and fry the other side until nice colour.

img_5524

5. Serve with your choice of topping and enjoy!


Cappuccino cake

My husband would like me to bake more, so I’ve been making cakes a bit more than I normally do. I’ve been trying to be creative, and make a variety of styles. Last time it was fruity pineapple cake (click here for recipe), this time it’s a cappuccino cake with a mild coffee flavor.

5 tbsp strong coffee
175g butter
175g light muscovado sugar
3 eggs
175g self-raising flour
1/2 tsp baking powder
~~~~~
400g double cream
50-75g dark chocolate (I use 85%)

1. Beat the butter and sugar together until fluffy. Add the eggs one at a time, beating into the mixture. If the mixture ‘curdles’ during this process, add a spoonful of the flour.

2. Mix the flour and baking powder together. Once all the eggs have been beaten into the butter – sugar mixture and it’s again fluffy, start adding the flour. When you have only little flour left, add the coffee, followed by the remaining flour. After the flour has been added and completely mixed, you don’t want to overdo the mixing.

3. Preheat the oven to 175°C / 345°F. Line a baking tin with non-stick baking paper (unless you’re using a silicone one), and pour the cake mixture in. Bake for about 45 minutes.

4. Once baked, take out of the oven. I tend to check the cake is baked through by using a metal knitting pin. When you pull it out, if it’s clean the cake is done, if some batter has got stuck to it it’s not done yet.

5. Lift the cake and the baking paper out of the tin and let the cake cool on a rack.

6. Remove the baking paper and cut the cooled cake into three layers.

7. On each layer, put some whipped cream and grated dark chocolate. Then put another layer on and repeat.

Pineapple and almond cake

I had added a whole pineapple on our food shopping delivery, thinking I would use it for a fruit salad. My husband, however, set me on a different kind of challenge when he asked if I could make a pineapple cake, pineapple granita and a pineapple ice-cream (yes, all from the one fruit!). The juicy pineapple makes this cake very moist and wonderful, and it’s very fluffy and light. I added some Amaretto for a super moist result. The amount I’ve used only gives a slight taste, if you want to make a boozy cake add more.

250g butter
2 dl caster sugar
4 eggs
4 1/2 dl plain flour
2 tsp baking powder
1 dl chopped almond
1/2 pineapple (about 3-4 dl once chopped to small pieces)
3 tbsp Amaretto (optional)

1. Prepare the pineapple, and chop to small pieces. Measure the dry ingredients together.

2. Whisk the butter and sugar together on high speed, until fluffy.

3. Add the eggs, one by one, whisking thoroughly on high speed.

4. Add the dry ingredients, followed by the pineapple pieces.

img_3687

5. Pour the mixture into your baking tin. I use a silicone one, so I don’t need to butter it, however if you use a non-silicone one you may want to butter and coat it with flour first.

img_3688

6. Bake in a preheated oven 170°C / 340°F for 1 hour.

7. If using the Amaretto, once out of the oven let cool for 10 minutes. Prick the cake all over with a needle, and pour the liquid all over the cake. Wait for about 30-60 minutes before serving.

img_3684

Rhubarb and strawberry tart

I’m more of a savory than a sweet kind of cook. I was inspired to make this sweet tart by the British Pie week, that’s been trending on Twitter. Before you get too confused though, the Finnish name for this kind of thing is a ‘pie’, which is why I thought of making it, before properly considering that in fact it’s more of a tart. I would however say pies and tarts are cousins, and I think this is a good enough entry to the pie week from me.  It’s very easy and simple to make, and you can easily change the filling ingredients to your taste.

Pastry
150g butter
1 dl sugar
1 egg
2 dl plain flour
2 dl porridge oats
2 tsp baking powder
~~~~~
Filling
200g rhubarb (about 4 stalks, depending on size)
300g strawberries
1 tbsp sugar
2 dl crème fraiche
1 egg

1. Mix all the pastry ingredients together. Spread the mixture at the bottom and sides of your dish.

img_2589

2. Chop the rhubarb and strawberries into small pieces. Pour over the pastry, to fill the tart / pie. Sprinkle the sugar on top.

img_2590

3. Mix the egg with the crème fraiche. Pour the mixture over the strawberries and rhubarb.

img_2591

4. Heat the oven to 200°C / 390°F. Place the tart into the preheated oven, and bake for 30 minutes.

img_2592

Carrot cake I

I have two recipes for carrot cake that I use. As both of them are nice, my dilemma was which one to post. I’ve decided that I will post one as I, and next time I’m making carrot cake I’ll make the other recipe as II.

200g carrots
2 eggs
1 1/2 dl caster sugar
1/2 dl chopped hazelnuts
2 1/2 dl self raising flour
1 dl oat bran
1 tsp bicarbonate of soda
1 tsp cinnamon
1 tsp vanilla sugar
1 tbsp orange juice
1 dl olive oil
1 dl buttermilk

1. Peel and finely grate the carrots.

2. Mix all the dry ingredients together.

3. Whisk the eggs and sugar together until foamy, fluffy texture, then carefully add the dry ingredients.

4. Add the carrots and all the other remaining ingredients.

5. Pour the cake batter on a flat based cake tin (If you use a tin, you may want to butter it first. I use a silicon cake mold, which doesn’t require buttering). The batter will appear very runny at this stage, but will be nice and fluffy once cooked.

img_2450

6. Bake in the low part of a preheated oven 170°C / 340°F for about 50 minutes.

img_2449

Cinnamon buns

This very Finnish bake (some might say Nordic) brings back many memories of cold winter days, steaming cup of hot chocolate with a big cinnamon bun. I don’t make them very often, but have been thinking about them for a while now. I’m so glad I decided to make them, this batch is the best I’ve ever made!

5 dl milk
2 saches of quick action dried yeast or 50g fresh yeast (I used dried)
1 egg
1 1/2 tsp salt
2 dl caster sugar
1 tbsp coarsely ground cardamom
1 kg wheat flour (400g plain flour / 400g strong white bread flour / 200g self-raising flour)
200g butter, melted
~~~~~
soft butter
cinnamon
caster sugar
~~~~~
egg

1. Measure 900g of the flour in your mixing bowl. I use food processor for mixing the dough, but if you’re mixing by hand use a large wooden fork, as it’s important to get air in the dough mixture. Save the remaining flour until later. I have to confess I found the perfect mix of flours by accident. I have normally mixed plain and strong white flour half and half, but run out just a little bit, so had to finish with self raising, which turned out to be the best situation.

2. Heat the milk until lukewarm. Add the yeast, salt, sugar and cardamom, and stir until sugar has dissolved. Add slightly beaten egg.

3. Pour the liquid mixture to the mixing bowl with the flour in, whilst mixing.

4. Knead for 5 minutes, then start pouring in, little by little, the melted butter. At this stage, it’s a good idea to add spoons of the remaining flour, to help the butter to be incorporated with the rest of the dough. Knead for another 5 minutes. During this time, if the dough keeps sticking to the bowl, add some more flour until it doesn’t stick anymore.

5. Cover the bowl with cling film and a cloth,  and place the bowl in a sink with hot water in. Leave to rise for an hour.

6. I then knead the dough again in the food processor for 30 seconds (or alternatively, you can of course do this by hand too).

7. As this is quite a big dough, I then cut it in half, and do the following steps in each half. With a rolling pin, roll the dough onto a flat plate. About 5-10 mm thickness should be good.

img_1135

8. Spread on soft butter, followed by ground cinnamon, and then sugar.

9. Let rest for 15 minutes, then roll the dough, and cut into desired size pieces with a knife.

10. At the top part of the bun, using your fingers bring the edges of the outer layer of dough to the middle part of top of the bun and press down, so that they stick. Let rise for 30 minutes, covered.

img_1140

11. Heat oven to 200°C (fan) / 400°F. Just before baking the buns, brush them with slightly beaten egg. Bake for 15 minutes. Depending on your oven, keep on eye on them whether you need to turn your tray half way.

Tosca cake

I was going to say this cake is from my native Finland, but like with many things, it’s very difficult to say whether something originated from Finland, Sweden or Norway (each country would always like to claim the ownership, take sauna for example), so I’ll expand a little bit and say this is Nordic baking.

200g butter
2 dl sugar
3 eggs (large)
4 dl flour (I use half plain, half self raising)
2 tsp baking powder
2 tsp vanilla sugar
1/2 lemon skin, grated
~~~~~
75g butter
3/4 dl sugar
1 1/2 tbsp flour
2 tbsp milk
70g almond flakes

1. Heat oven to 175°C / 345°F.

2. Whisk butter and sugar together, until light fluffy texture. You may find this easier if the butter has been sitting in the room temperature for a while prior to this, and is soft.  Add eggs one at a time, whisking as you go. If you find it difficult to incorporate the eggs to the butter/sugar mixture, you might want to add a small spoonful of  the flour as you go.

3. Mix all dry ingredients of flour, baking powder, vanilla sugar and lemon skin together. Add to the butter, sugar and egg mixture, and mix together. Keep in mind that you should not be mixing it vigorously or for a long time after adding the flour, as this will make your cake to fail.

4. Pour the mixture to your cake tin. I these days use silicon ones, so I don’t need to butter them, but if you are using the older style tins, you would like to butter them, and then add some fine breadcrumbs until all of the inside of the tin is covered. This will prevent the cake from sticking to the tin. Bake on the lowest shelf of the oven for 20 minutes.

img_0988

5. Whilst the cake is cooking, add all remaining ingredients of butter, sugar, flour, milk and almond flakes to a pan, to make the topping. Heat, and stir everything together until sugar has melted and all ingredients are mixed together.

img_0992

6. After the cake has been cooking for 20 minutes, pour the topping over it, and bake in the oven for another 20 minutes.