Cheese soufflé with bacon crumb

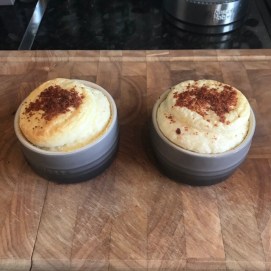
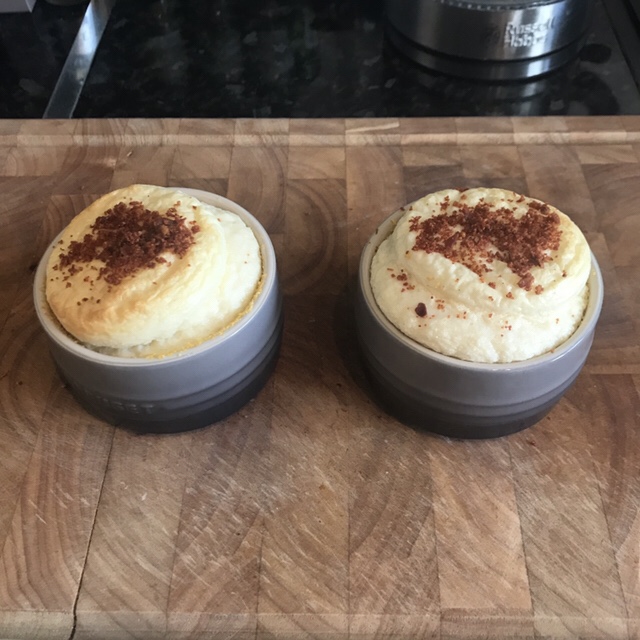
I’ve been wanting to attempt making soufflé for quite a long time, and finally thought it was time. I thought it might be a interesting change to my usual soft boiled breakfast eggs, and to give a bit more of a breakfast feel, top it with bacon crumb. I was relieved that my soufflés rose. My husband was worried the cheese would be too overpowering, however that luckily wasn’t the case. Depending on the size of your ramekins, this recipe could make 3-4.

15g butter

15g flour

150ml milk

35g finely grated gruyere cheese

1/2 tsp mustard powder

pinch or two ground white pepper

1 egg yolk

3 egg whites

1/4 tsp lemon juice

~~~~~

butter

fine breadcrumbs, about 1 tbsp in each ramekin

2-3 thin bacon rashers

1. Grill the bacon slices in the oven at medium setting for about 10-12 minutes, turning once. Let it cool, and crumble very finely.


2. Preheat the oven to 150°C (fan) / 300°F, keeping the oven tray in during the heating.

3. Butter the ramekins (easiest way is to put a small piece of butter in a kitchen tissue, and wipe the ramekins with that by hand. Pour the breadcrumbs in the ramekins, and turn them around until all surfaces are coated.

img_4431

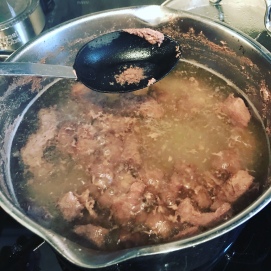
4. Warm the milk in a pot. In another pot, melt the butter, add the flour and mix together. Little by little, pour the milk in, whisking together until smooth. Add the cheese and mustard powder, mix well and cook for few minutes, stirring. Remove from the heat and allow to cool a little bit.

img_4438

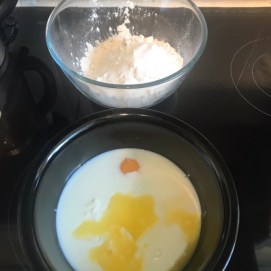
5. Whisk the egg whites and lemon juice until fluffy and peaks form.

img_4440

6. Whisk the egg yolk to the slightly cooled mixture, and season with white pepper. Add a third of the egg whites, and whisk into the mixture. After this, fold the remaining egg whites in carefully, using a large spoon or spatula.

img_4444

7. Pour the mixture into the ramekins, fill them about 3/4 to the capacity. Place the ramekins on the warmed oven tray, and bake for about 15 minutes. Don’t open the oven door during the baking. Once baked, sprinkle the bacon crumb on top.

img_4448

Restaurant review: Texture, London

The quality range seems to be very vast in the group of restaurants that have 1 Michelin star. My husband and I have thought this many times in the past, and within the last few weeks have dined at a 1 star restaurant that was definitely at the lower end of the 1 star places we’ve been to, and one that was at the top end of all the 1 star restaurants. The difference between the two restaurants is so big that I’m not sure how they can both have the same rating.

We decided to go for the fish tasting menu with matching wines. Texture is a Scandinavian restaurant, and we were surprised by a fusion of Scandinavian and Asian flavours. One would think these two to be too far from each other, to be successfully joined together, but it indeed works together very well! What is also interesting is that the restaurant doesn’t use butter or cream for their cooking.

We arrived 20 minutes early for our booking, which was the first seating, and were pleased to be welcomed in. We had our champagne aperitif, as well as nibbles at the bar, whilst waiting for the restaurant service to begin. This was at bonus to the place, because some places don’t let you in until the first seating starts, which is especially annoying if it’s raining.

img_4375

The menu started with a wonderful beetroot soup, which was earthy and sweet, with a velvety consistency. It was paired with Henriot Demi Sec champagne, which complimented the food very well. on it’s own, the sweetness of the champagne was very present, however when had together with the food it didn’t seem sweet at all.

img_4394

Next course of salmon was a delight, and the best course of the menu for my husband. Salmon can often be overcooked, but this one was cooked exactly how it should be, very moist and pink inside. It was served with oscietra caviar, slightly mustard flavoured sauce, sorrel, perfectly thin rye bread and very well pickled cucumber. All the flavours worked very well, served with mild flavoured Italian Garlider 2016 Sylvaner.

img_4395

Next dish of scallop had flavours of coconut, kaffir lime and lemongrass. They were skillfully used, and weren’t overpowering the dish. one thing my husband didn’t like was fresh coriander, that had been used. It seems a lot of restaurants these days use fresh coriander as a garnish to a lot of their plates, even though it has a strong, overpowering taste. The South African FMC 2016 Chenin Blanc served with this dish was a big hit with both my husband and I. Even though this wine is a little bit more complex, with slight oakiness, and you might wonder how it could possible go with the flavor combinations of the dish, the wine complimented the dish well, as well as being a delight to drink on it’s own.

img_4396

Cod was cooked very well, the piece was very meaty and flaky. I think cod is quite a boring and tasteless fish, so it needs interesting accompaniments. It was served with avocado, brandade, tomatoes which were prepared very nicely, and chorizo. There was also a little bit of potato mash under the fish, and some cannellini beans. I think the fish was hidden under a lot of ingredients, and plating could’ve perhaps been a bit more refined for this dish. I also think that the beans didn’t seem necessary. Wine pairing with this dish was Italian 2012 Pinot Noir Montalcino. I’ve had Pinot Noir served with monkfish before, but not with cod. The wine didn’t overpower the cod, and suited all the ingredients in the dish.

img_4397

I wasn’t too keen on the taste of the pre dessert palate cleanser. It was clean but dull flavoured, however I would’ve liked a bit more freshness and sharpness from it.

img_4398

There were elements I really liked in the dessert, and also some I wasn’t too sure about. The skyr pannacotta was nice, and I loved the nectarines, I thought these were the star of this dish. The ice-cream for me didn’t have much flavor. Wine served with the dessert was German 2013 Frühlingsplätzchen Riesling Auslese, which was a sweeter Riesling, however not too syrupy and sweet like some dessert wines might be.

img_4399

Rating: ★★★★☆

Winter warmer beef and root vegetable soup

I was planning on making this soup for few weeks. Since I started planning it I’ve gone on a diet, and after I made it, I decided to count the calorie content of the soup. My recipe makes a really big amount, which only contains 2000 kcal. I was very pleased to find out that a portion size only contains a couple of hundred calories. The purpose of this soup was not a low calorie meal options, but it for sure is an added bonus. You will still get soft meaty pieces of beef, and the fresh vegetables bring such great flavour. It’s perfect winter warmer food.

600g diced beef
500g swede (about 1/2 of a large swede)
350g turnips
400g parsnips
250g carrots
600g potatoes
1 onion
125g cauliflower
125g broccoli
2 cloves of garlic
2 dl frozen peas
2 tsp sea salt
1 tsp ground allspice
1 tbsp black peppercorns
3 bay leaves
handful of fresh thyme sprigs
4 litres of water

1. Place the beef pieces and half of the water to a large pot. Cover with a lid, bring to boil, and boil for couple of hours, until the pieces are starting to get soft. It doesn’t necessarily matter what cut of the beef you use. If you are using tough, cheaper cuts, boiling them this way before you add the other ingredients will make them wonderfully soft. At the beginning of the boiling, keep on eye on the pot, as the ‘muck’ coming out of the beef may foam a lot. You may want to skim some of the foam / muck away. After about an hour’ add the salt, peppercorns, allspice, finely chopped garlic, bay leaves and thyme.

img_4401

2. While the beef is boiling, prepare all the vegetables. Peel and cut the turnips, swede, parsnips and carrots into small pieces. Peel the potatoes, and cut them into bigger, still bite sized pieces. Finely chop the onion, and cut the broccoli and cauliflower into small florets.


3. After the beef has been boiling for couple of hours (or longer if required) and is soft, add the carrots, swede, parsnips, turnips and potatoes, and the remaining half of the water. Bring back to boil, and simmer for about 10 minutes.

4. Add the onion, cauliflower, broccoli and peas and simmer for another 10 minutes. Check the taste, and add seasoning, if required.

img_4405

Fluffy blueberry buttermilk pancakes

I’m more of a savoury breakfast person, however from time to time it’s nice to opt in for the sweet version. These kind of American style pancakes haven’t really found their way to Finnish or British breakfast tables, so I’ve not had much experience with eating or making them. I wasn’t happy with my first attempt some time ago, however now, after research, and then combining what I read to my own recipe, I ‘m pleased to announce that the result has been magnificent! These came out super soft, airy and fluffy with great flavour.

350ml plain flour
2 tsp baking powder
1/2 tsp bicarbonate of soda
1 tbsp sugar
1/4 tsp salt
250ml buttermilk
100ml milk
1 large egg
25g butter, melted + extra for frying
175g blueberries

1. Place all the dry ingredients in one bowl, and mix together with a spoon. In another bowl, whisk all the wet ingredients together.

img_4245

2. Spoonful at a time, add the flour to the wet ingredients, mixing in with the whisk. You don’t however want to overwork the batter (like with any cakes once flour is added), as this will end in a dense, rather than fluffy texture. The batter will be quite thick.

3. Leave to stand for 10 minutes.

4. Rinse and drain the blueberries.

5. Heat the frying pan with little butter on a medium – low temperature. Place lumps of batter on the pan. Add some blueberries on top and press them into the batter a little bit. Once the batter has set (around 5 minutes, depending on the thickness of the pancakes and the heat of the pan) turn over. Fry the other side for about 1-2 minutes.

img_4255

Finnish pea soup

This is one of the soups I’ve really been missing from my native Finland. Ask anyone what food is served on Thursdays, and they should all say it’s this pea soup, followed by pancake for dessert. I found it difficult to find dried marrowfat peas traditionally used, so I decided to try a soup mix of pearl barley, green split peas, haricot beans, marrowfat peas, red split lentils, yellow split peas and brown rice, and was absolutely delighted at how close it came to the real deal! I was organized and planned my roast pork which literally fell apart (click here for recipe), for the weekend before making this soup, and it was perfect.  You will need to be a little bit organized when making this soup even if you haven’t planned to cook the meat in advance, because you need to soak the dried pulses for 12 hours. This recipe will make a big soup.

500g half soup mix of dried pearl barley, green split peas, haricot beans, marrowfat peas, red split lentils, yellow split peas and brown rice, half dried green split peas
~300g pork shoulder meat, pulled to threds
4 litres water
2 beef stock pots
salt
white pepper

1. Place the dried pulses in a large bowl, and cover with plenty of cold water. Leave to soak for 12 hours.

2. Drain and discard the soaking water. Place the pulses in a large pan, together with 4 litres of water. If your pan isn’t large enough, start with 2 litres, and add more after some liquid has evaporated. Bring to brisk boil, and boil for 10 minutes, unvovered.

3. If using uncooked meat, place the piece in the pan, skin removed. If you are using already cooked meat, leave until later. Bring the mixture to a softer boil, add the stock pots and cover with a lid. Boil for 2 hours. Stir a few times during the cooking.

4. If you cooked the meat with the soup, remove the piece, pull apart to shreds and add back to the soup. If you are using pre-cooked meat, add it in now, and heat through, stirring occasionally.

5. Season with the salt  and pepper to taste. You should have a nice, slightly thick soup. Also, it will taste even better when reheating it again the following day. As a serving suggestion, do also try it with a little bit of mustard mixed in.

img_4244


Seafood and chorizo paella

Just like with risottos, I’ve never liked paella – until I made my own. I’m also not great friends with seafood with shell on in the food (I know it’s supposed to make it tastier, however I don’t like having to remove shell whilst eating), so I’ve used a way around it.

serves 4

600ml water
200g shell-on tiger prawns
1 tsp sea salt
1 tsp black peppercorns
400g cooked mussels with shell on
~~~~~
2 tbsp olive oil
3 cloves of garlic
1 onion
1 small green finger chilli
10 plum tomatoes
1 red pepper
200g cooking chorizo
150g raw king prawns
200g raw squid
100ml white wine (Sauvignon Blanc)
1 lemon, juice squeezed
2 dl frozen peas
250g Bomba paella rice
pinch of saffron
1 tsp black pepper
2 tsp paprika powder
1/2 tsp salt

1. As I don’t like seafood with shell on in my food, I use the shells for the stock separately. Pour the water in a pan, and heat to boil. Remove the heads and shells from the tiger prawns, and add to the water (keep the actual prawns aside for later). Add the sea salt and boil, uncovered, for 10 minutes. Add the mussels, and simmer, covered, for 8 minutes. Once done, pour into a jug through a sieve (I also use a piece of muslin). Whilst prepping the other ingredients, let cool. Once cooled, remove the mussels from the shells.

2. Whilst the shells and mussels are boiling, I tend to prep all the other ingredients before starting the cooking. Finely chop the onions, garlic and chilli. Heat olive oil in a large pan. Fry the onions until softened, and add the garlic and chilli. Also add the saffron and half the paprika powder.

3. Chop the chorizo and squid, and add to the pan with the raw king prawns. Fry for 5-10 minutes, until the prawns and chorizo are cooked.

4. Add finely chopped tomatoes and pepper, mixing everything together.

img_4230

5. Add the paella rice, and stir together. Pour the wine, and let bubble. Once almost reduced, add the stock liquid. Stir, then boil uncovered and undisturbed, without stirring for 12 minutes. During this time, sprinkle the salt and black pepper on top.

img_4233

6. Add the peas, mussels and tiger prawns, and stir until warmed through. Add the remaining half of the paprika powder and the lemon juice.

Slow cooked roast pork shoulder

After not having had time for much home cooking lately, it was wonderful to whizz up this perfect fall-apart, melt-in-the-mouth shoulder of pork. I will also be using some of the leftover meat for another dish later in the week (keep your eyes peeled). This recipe does take quite a long time to cook, but I prepared the seasoning on the previous evening, and started the cooking as soon as I woke up in the morning. You can leave it unattended for a long time in the middle part of the preparations, so I also managed to go shopping whilst it was in the oven. For foolproof recipe for perfect Yorkshire puddings, click here.

1.6 kg piece of pork shoulder
3 sprigs of thyme, leaves
2 tsp sea salt
1 tbsp black peppercorns
1 tsp yellow mustard seeds

1. Crush and mix all the ingredients together. Cut slits on the pork skin, and rub the spice mixture all over the skin, slits and meat. If you have time, do this the evening before you intend to cook the meat. Place in a container, cover and refrigerate overnight.

2. Heat oven to 220°C / 430°F. Place the pork on a roasting rack, and roast for 30 minutes uncovered. Cover the pork properly by couple of layers of foil, and reduce the temperature to 160°C / 320°F. Roast for 4 1/2 hours.

3. Remove from the oven, and increase the temperature to 180°C / 360°F. Cut the skin off, and wrap the meat in the foil. To keep it warm, you may also want to wrap the foil package in a kitchen cloth / towel.

4. If cooking roast potatoes in the cooking juices from the pork, place the potatoes at the bottom of the roasting tray. Place the skin on the rack on top of the potatoes. Roast for about 1 hour 20 minutes , turning the potatoes every now and then (around every 20 minutes).

img_4203

Murusoosi (mince beef sauce)

The direct translation for this mince beef sauce is descriptively ‘crumb sauce’. It’s perhaps not a pretty plate of food, but it’s one of my all time favourite childhood foods and I still cook it to date.

serves 2-4
vegetable oil
250g mince beef
1 onion
50g butter
1dl plain flour
500ml water
salt
black pepper
paprika powder
ground allspice

1. Peel and finely chop the onion. Place in a frying pan together with a splash of vegetable oil and the mince beef. During the cooking keep breaking the beef into smaller, ‘crumb’ like pieces, mixing together with the onion. Once ready, place aside in a bowl.

img_4143

2. Boil the water. I’ve noticed that using hot water rather than cold will more easily give you a sauce that’s lump free. Melt the butter in the same frying pan you used for frying the meat. Once melted, add the flour. Mix together with the butter. If the mixture appears too dry (pictured below), you can add a little bit more butter. Fry, stirring, in medium heat until the butter – flour mixture has browned.

3. Reduce the heat to lowest possible setting. Pour about 300ml of water to the mixture. Whisk together until smooth. Add the remaining water, to the desired thickness. Add the cooked mince beef and the sauce together.

img_4134

Mussels with spaghetti

This recipe makes wonderfully flavoursome sauce for your pasta. There isn’t much cooking effort to be made, the most time is spent chopping the ingredients. Depends on your portion sizes, this could serve 2-4 people.

olive oil
1 celery stick
3 spring onions (or 1 onion)
5 chestnut mushrooms
4 cloves of garlic
juice of 1 lemon (or 2 tbsp if not using fresh lemons)
100ml white wine (I use Sauvignon Blanc)
400g mussels
150g plum tomatoes
200ml creme fraiche
salt
black pepper
small bunch of dill
2 tbsp grated Parmesan cheese

1. Cook your preferred pasta.

2. Finely chop the celery and onions. Slice the mushrooms, and peel and squeeze the garlic. Fry in the olive oil for 5 minutes.

img_4123

3. Add the white wine, lemon juice and mussels, and boil, covered with a lid, for 5 minutes.

img_4122

4. Then add the creme fraiche, halved plum tomatoes and Parmesan cheese. Season with salt and pepper and add the dill.

img_4121

5. Add the cooked pasta to you sauce, mix well together and warm through. Enjoy with some additional Parmesan cheese.


Homemade pizza

Whether you’re having a quiet, cosy night in by yourself or with family, or are hosting a house party, homemade pizza never disappoints. The good thing is that there are no rules when it comes to the toppings, and you can make yours exactly how you like. It’s also a great way to use up some leftover ingredients in your fridge. I often make mine with mince beef, however this time I made mine half chicken – half tuna.

Dough for the pizza base
350g strong white bread flour
1 sachet of fast action dried yeast
1/2 tsp salt
1 tsp sugar
1 tbsp olive oil
2 dl lukewarm water

1. Mix all the dry ingredients together.

2. Mix the warm water and oil together, and add to the dry ingredients slowly, whilst mixing. I use a food food processor, but if you’ve doing this by hand a wooden fork is good, as it will tie air into the dough. Knead for about 10 minutes. Kneading the dough for this long will help you get it to rise nicely.

3. Cover with an oiled cling film, and a non-see-through cloth, and leave to rise for 30 minutes.

4. Flatten the dough by hand. I then tend to use a rolling pin to get the dough thin. I usually make one big pizza, so I then place the dough in the oven tray, and stretch it to the whole size of the tray by hand. It’s easy to do, as the dough is very flexible and won’t break easily.

Tomato sauce

1 celery stick
1-2 carrots
1 medium onion
2-3 garlic cloves
handful of fresh basil leaves
handful of fresh parsley
1 tin of chopped tomatoes
4 tbsp tomato purée
dried oregano
dried herbs de provence
olive oil
salt
black pepper

1. In a blender, finely chop onion, garlic, carrot, celery and fresh herbs,  and fry in olive oil in  pan.

2. Blend the chopped tomatoes, and add to the pan. Add dried herbs and tomato purée, and season with salt and pepper.

3. Put back in the blender, to make extra smooth texture, otherwise it’ll be somewhat coarse.

Building your pizza

1. Spread some tomato sauce on.

2. Sprinkle most of the grated cheese on. I tend to use something like cheddar. Today I used a mixture of cheddar, red leicester and manchego.

3. Add the other ingredients of your liking, and sprinkle the remaining cheese on. I used tomatoes, red pepper, mushrooms and red onion. On the tuna half, I crumbled some blue cheese on top, on the chicken half (I cut the chicken into small pieces and pan fried it) I used the same cheese mixture as at the bottom of the pizza.

4. Heat the oven to 250°C / 480°F. Place the pizza on the bottom shelf and cook for 15 minutes. When I take the pizza out I tend to squeeze some raw garlic, and sprinkle some dried oregano on (this might be a Finnish habit).