Southern pulled pork

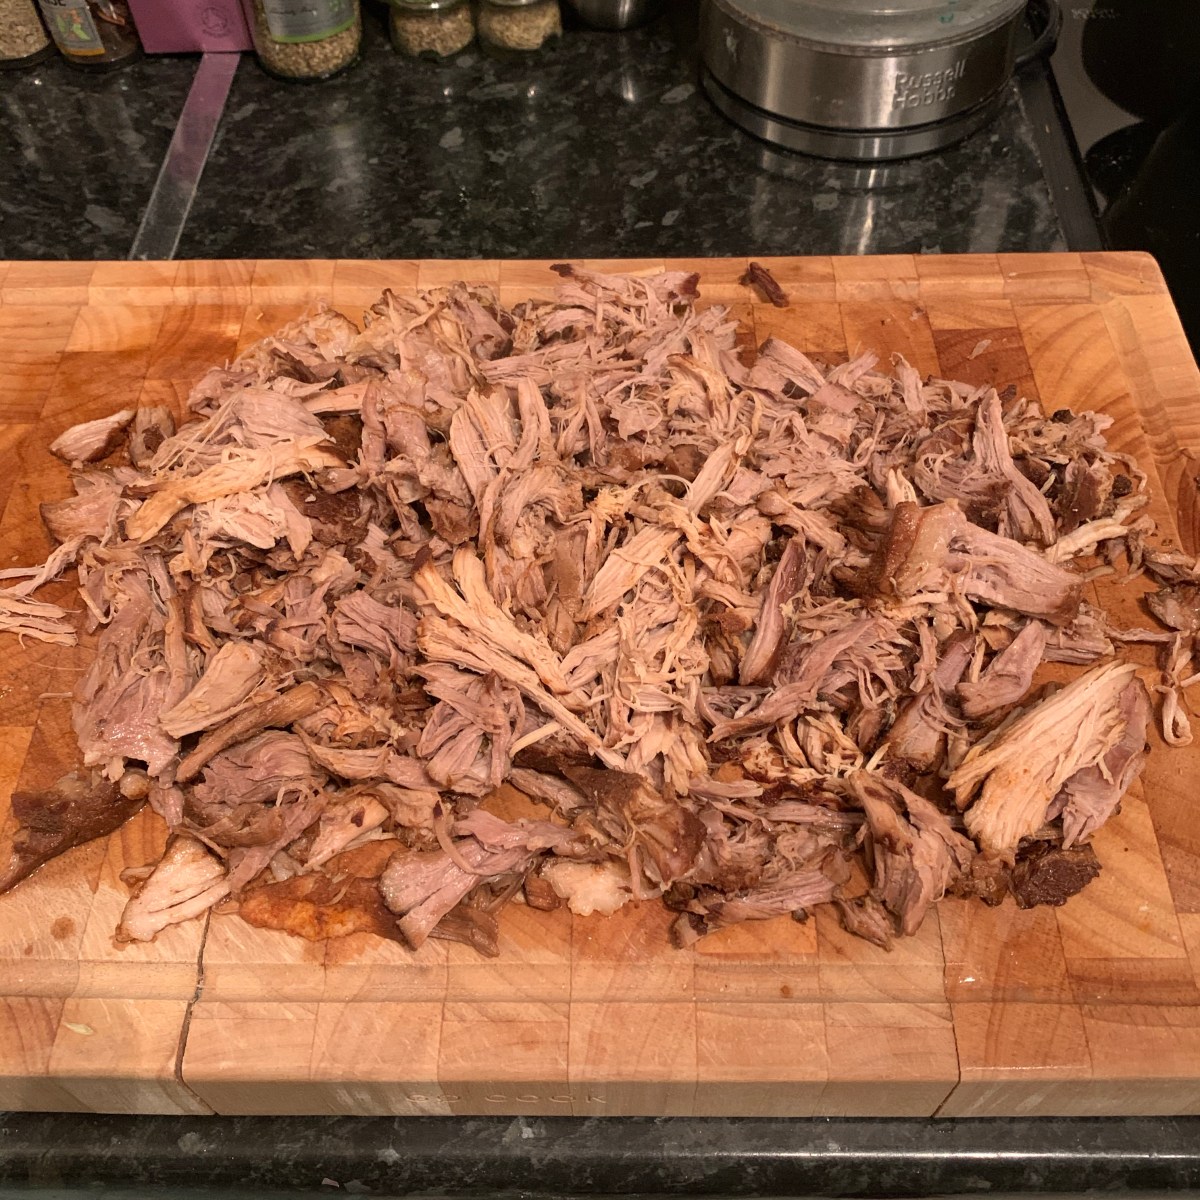
I don’t think I know anyone who wouldn’t like this comfort food of pulled pork. You can eat it in various different ways, hot or cold. You also get a lot from one piece of meat, and it can easily be frozen for those laze days when you don’t feel like cooking.

~2kg boneless piece of pork shoulder

Marinade:
150g dark muscovado sugar
2 large onions, chopped
16 cloves of garlic
1 tbsp tabasco
1 tsp coriander seeds
4 tbsp english mustard powder
4 tsp paprika powder
200ml tomato ketchup
2 tbsp Worchester sauce
4 tbsp treacle
2 tbsp sea salt

1. Blend all marinade ingredients together into a paste.

2. Pour the marinade paste over the pork shoulder and massage onto the pork, making sure all of it is coated. Marinade in the fridge for at leat 2 hours.

img_1750

3. Place in a pot. Add water so that it just about covers the meat. The meat normally comes with the skin, I tend to cook it with the skin on, and remove it after the cooking. Cover the pan with a lid. Bring to boil, then reduce the heat and simmer for 2 hours, or until the meat pulls apart.

4. I like to spoon some of the marinade / cooking liquid over the meat for some extra flavour. On this occasion I served my pulled pork in a homemade pitta bread (click here for recipe) with some lettuce, tomato and gherkins.

img_1758

Laskiaispulla (Shrove Tuesday bun)

I know Shrove Tuesday is usually called  Pancake Day. One of these years I’ll make pancakes on this day for my husband, however at the moment he’s still getting the Finnish version – buns filled with jam and whipped cream.

5 dl milk
2 saches of quick action dried yeast or 50g fresh yeast (I used dried)
1 egg, plus one more for brushing
1 1/2 tsp salt
2 dl caster sugar
1 tbsp coarsely ground cardamom
1 kg wheat flour (400g plain flour / 400g strong white bread flour / 200g self-raising flour)
200g butter, melted

1. Measure 900g of the flour in your mixing bowl. I use food processor for mixing the dough, but if you’re mixing by hand use a large wooden fork, as it’s important to get air in the dough mixture. Save the remaining flour until later. I have to confess I found the perfect mix of flours by accident. I have normally mixed plain and strong white flour half and half, but run out just a little bit, so had to finish with self raising, which turned out to be the best situation.

2. Heat the milk until lukewarm. Add the yeast, salt, sugar and cardamom, and stir until sugar has dissolved. Add slightly beaten egg.

3. Pour the liquid mixture to the mixing bowl with the flour in, whilst mixing.

4. Knead for 5 minutes, then start pouring in, little by little, the melted butter. At this stage, it’s a good idea to add spoons of the remaining flour, to help the butter to be incorporated with the rest of the dough. Knead for another 5 minutes. During this time, if the dough keeps sticking to the bowl or is too soft, add some more flour until it doesn’t stick anymore.

5. Cover the bowl with cling film and a cloth,  and place the bowl in a sink with hot water in. Leave to rise for an hour.

6. I then knead the dough again in the food processor for 30 seconds (or alternatively, you can of course do this by hand too).

7. Make into balls. Cover the individual buns with cling film and a cloth, and let them rise for 30 minutes.

img_2317

8. Preheat the oven to 200°C / 390°F.

9. Brush the buns with egg, then cook for about 15 minutes.

10. Once cooled, cut as many buns as you’re wanting to prepare as Laskiaispulla, half, so that you have bottom and top halves. Put some whipped cream on both halves. Add jam on the bottom half, the place the top half on top. The buns will be presented in this way, however when you eat them you probably want to eat each half separately.


Oven baked creamy salmon and vegetables

Salmon is a great versatile, tasty and meaty fish that can be cooked in many different ways. It is also very healthy, and in particular is rich in Omega 3.

Serves 2
2 large handfuls of spinach
1/2 courgette (zucchini)
2 small turnips
100g green beans
~6 florets of broccoli
2 cloves of garlic
2 salmon fillets
200ml cream
salt
white pepper
cayenne pepper

1. Preheat the oven to 180°C / 360°F. Peel and chop the turnips into bite size chunks. Chop the courgette, green beans and broccoli also into bite size pieces. Place the spinach at the bottom of an oven dish, followed by the other vegetables. Squeeze the garlic on top. Sprinkle with some salt and pepper.img_1537

2. Place the salmon on top of everything, pour the cream over, and season the salmon with some salt, pepper and cayenne pepper.

img_1538

3. Place in the preheated oven, and bake for 20 minutes. If you don’t like your vegetables crunchy, you might want to bake the vegetables on their own first for 5-10 minutes, before adding the salmon and cream.

Nasi Goreng with chicken

This dish is something I was already cooking before our holiday to Bali, but it was only during this holiday that I learned Nasi Goreng actually is Indonesian food. I had to of course sample it a few times whilst there, to find out how my one compares. Having now eaten it at it’s original, local environment, I’m proud to say mine is as good as the original. Nasi Goreng itself means fried rice. I didn’t particularly plan that I was going to make this this week, so I didn’t have prawns that are normally part of it, but I’ve added them to the recipe. Last time I made the paste I saved half in the freezer, and used it now.

Nasi Goreng paste
3 tbsp ground nut oil
4 garlic cloves
2 large shallots
15g roasted salted peanuts
6 green small chillies
1 tbsp tomato puree
1 tsp dried shrimp paste
1 tbsp dark soy sauce

Nasi Goreng rice
1.5 dl uncooked long grain rice
2 chicken breasts, cut into thin strips
2 large eggs
vegetable oil (I use rapeseed oil)
4 large shallots, finely chopped
150g peeled and cooked prawns
1/2 cucumber, chopped
3 spring onions, chopped
salt
black pepper
1 tbsp light soy sauce

1. Put all paste ingredients in a blender, and blitz together until smooth paste.

2. Cook the rice in boiling, salted water until tender. Depending on rice this will take around 10-15 minutes. Drain, and rinse. Drain again, and spread on a tray to cool during the other food prep.

img_1531

3. Beat the eggs with salt and pepper, and fry in a little oil into three thin omelettes, frying briefly on both sides. Roll them up, and cool. Once cooled, cut into thin strips.

img_1530

4. Heat a good splash of oil (few tbsp) in a pan, and add about half of the paste, or 4-5 tbsp. Fry for 1-2 minutes, stirring,  and add the shallots and chicken. Stir, making sure all chicken pieces are coated with the paste.

img_1527

5. Once the chicken is cooked through, add the cooled rice, and prawns. Fry, stirring, until warmed through, then add the cucumber, spring onions, egg strips and soy sauce, and stir fry for couple of minutes.

Pitta bread

I’ve been wanting pitta bread and hummus (Click here for homemade hummus recipe) for a couple of days now. I often wake up much earlier than my husband on the weekends, so I’ve decided to make these today as a Sunday breakfast.

makes 8

350g strong white flour
1 1/2 tsp salt
1 tsp sugar
1 tsp dried yeast
1 tbsp olive oil
200ml lukewarm water

1. Mix all the dry ingredients together in a mixing bowl. Put the water and oil in another bowl / jug. Pour the liquid onto the dry ingredients, then knead for 10 minutes. You can do this by hand, or use a food processor. I use the machine, on strength 1.

img_1522

2. After kneading time, cover and leave to rise in a warm place for an hour. I usually use a metal mixing bowl, put some hot water at the bottom of the sink (about 2-3 cm / an inch), then place the bowl in the water.

img_1524

3. Place the rested dough on a slightly floured surface, and cut into 8 pieces. Shape the pieces into balls, then cover with oiled cling film and leave to rest for 10 minutes.

img_1525

4. After the resting time, flatten the balls with floured hands. Using a rolling pin, roll to oval shape flat breads, about 15cm (6 inches) long and 5mm (1/4 inch) thick. Cover, and leave to rise for 30 minutes.

img_1526

5. Preheat the oven to 220°C (fan) / 430°F. Bake the breads for about 5-7 minutes. Remove from the oven and cool on a wire rack, then enjoy!

img_1527

img_1528

Homemade hummus

I think homemade dips and sauces are always so much tastier than shop bought ones, not to mention they are missing the preservatives present in ready made foods. You can also always add or reduce the amount of certain ingredients, to make it exactly to your taste. I think I have now perfected my hummus recipe to how I like it, I hope you do too. And as a bonus, this is very simple and quick to make. Originally from the Middle East, before spreading to the Mediterranean region,  this dip is now enjoyed world wide.

1 can of cooked chickpeas
2 tbsp of the liquid from the chickpeas
4 tbsp lemon juice
3 cloves of garlic
1/2 tsp salt
1 tbsp toasted sesame oil
1 tbsp olive oil

1. When draining the chickpeas, reserve the liquid in a bowl.

2. Put all ingredients in a blender, and whizz until smooth.

Serving tip

I normally have this with pitta bread. I’m actually currently making it, however we’ve already eaten most of the hummus with the below accompaniments, as it was so tasty!

img_0976

Grilled tuna steak

Fresh, proper piece of tuna steak is very different from the tinned version most are used to. It is meaty, and flavoursome, which can also be enhanced by marinating. To cook, I just popped it under the grill in the oven this time, which was very easy and hassle free.

Serves 2

two tuna steaks

Marinade
1 small green chilli
1 garlic clove
1 piece of
root ginger, about the size of half a thumb, peeled
1 tbsp lemon juice
2 tbsp olive oil
handful of parsley (a few stalks)
1 tsp sea salt
1/2 tsp black pepper

1. Finely chop chilli, ginger and parsley. Peel and squeeze the garlic clove. Mix all marinade ingredients together. Place the tuna pieces in a container in the fridge. 8 hours marinating time would be ideal, if this is not possible try to do at least 2 hours.

img_1492

2. Preheat the grill to medium heat. Place the tuna pieces under the grill, and cook for about 12-14 minutes, turning once half way through the cooking.

Rack of lamb with garlic mashed potatoes

Rack of lamb is quite a simple Sunday lunch food to cook, and a nice cut of meat. The longer you have the marinade on, the better the result will be. I would try to have the meat marinating for at least four hours, but overnight would be ideal. In terms of the cooking time, I like mine medium (pink), and the cooking times on here provide exactly that.

Serves 2
Lamb rack

25g butter for searing
~~~~~
Marinade
2 cloves of garlic
leaves from 3 rosemary sprigs
leaves from 4 thyme sprigs
6 black peppercorns
2 tsp sea salt
2 tbsp olive oil
~~~~~
Garlic mashed potatoes
5 large potatoes (about 800g)
50g butter
1/2 – 1 tsp salt
100ml milk
50ml – 100ml double cream
5 cloves garlic
2 sprigs rosemary
1 tsp sea salt (or standard table salt)

1. Mix all the marinade ingredients together. I tend to crush them together with a pestle and mortar.

2. Clean the rack bones with a sharp knife, to remove the sinew. It won’t however be a problem if you don’t, this is only done for aesthetic reasons, and won’t affect on the cooking of the meat.

3. Rub the marinade mixture all over the meat, cover with cling film and place in the fridge for four hours, or overnight.

4. Peel and quarter the potatoes, place in a pot with four out of the five garlic cloves, rosemary and salt. Cover with water, bring to boil and cook until the potatoes are soft. Once cooked, pour the water off, and remove the garlic cloves and rosemary sprigs / leaves. Mash the potatoes, and add the butter, milk, cream and salt. Finally, peel and crush the remaining garlic clove into the mash.

5. Heat oven to 200°C (fan) / 430°F. Melt the butter in a frying pan suitable for oven. Place the rack in the pan fat side down, and brown for a few minutes. Then sear both ends of the rack. Sear the remaining side, leaving the rack on the frying pan fat side up. For aesthetic reasons, you can cover the bones with foil, so that they won’t colour too much in the oven.

img_1485

6. Place the frying pan and the lamb rack in the preheated oven. For medium (pink) meat, cook for 20 minutes.

7. After the cooking time has passed, remove from oven. Cover the meat with foil, and rest for 10 minutes.


Runeberg’s tart

The name for these mini cakes is slightly misleading, because they’re called tarts even though they are cakes. Direct translation between languages can sometimes be very difficult when you want to be true to the original name, but know at the same time it will give people a wrong impression. These delightful cakes are traditionally eaten once a year, in celebration of Finland’s national poet Johan Ludvig Runeberg, on 5th of February.

makes about 8
Batter
1 egg
25 ml caster sugar
1/2 dl light muscovado sugar
100g butter, melted and cooled
1/2 dl double cream
2 dl plain flour
50g ground almonds
1 tsp baking powder
1/2 dl finely chopped hazelnuts
1 tsp vanilla sugar (or 1/2 tsp vanilla extract)
1 tbsp Amaretto
1tsp almond extract
~~~~~
Sugar syrup
1 dl sugar
1/2 dl water
2 tbsp cognac
~~~~~
rasberry jam
icing sugar
water
a dash of Amaretto

1. Beat the egg, sugars and the extracts until fluffy. Whip the cream until soft peaks are starting to form. Add the butter, cream and Amaretto to the egg and sugar mixture, and mix together.

2. Mix all the remaining dry ingredients together, and fold into the wet mixture.

img_2242

3. To make the cakes the traditional shape I had to improvise, as I don’t have the molds (will have to try to remember next time is visit Findland to buy some). I used non stick baking paper to make cylinders, which do work pretty well. This step of course isn’t necessary, and you could just use muffin cases, if you’re not too particular of the shape of the cakes.

img_2241

4. Preheat the oven to 180°C / 355° (fan). Bake the cakes for about 15-20 minutes.

5. While the cakes are cooking, prepare the syrup. Place the sugar, water and cognac in a pan, and bring to boil, cooking until all the sugar has dissolved.

6. Once the cakes have cooked, let cool for 5 minutes. Prick holes in them with a thin cocktail stick / needle. Then, brush the cakes with the syrup, using all of it. Let the cakes moisten for half an hour.

img_2240

7. Cut the tops of the cakes, to make them flat, and turn upside down. Place raspberry jam on top, leaving a space all around it. Mix the icing together, making a thick mixture, and finish the cakes with a ring of icing around the jam. Let the icing to harden, and the cakes are ready to be enjoyed!

img_2237

Beetroot and dill cured salmon

Cured salmon is one of the foods often enjoyed as part of the Scandinavian kitchen. There are many variations to it, however the basics you will need are sugar and salt. The whole process is based on the reaction called osmosis, and is an ancient way of preserving foods that wouldn’t last fresh for long otherwise. During the curing, you will notice a lot of liquid will be drawn out of the fish. The cured fish will last in the fridge for few weeks, however I doubt you will have anything left for that long.

2 raw beetroot, grated
500g piece of fresh salmon
50g table salt
90g caster sugar
1 tbsp yellow mustard seeds
1 tbsp black peppercorns
a bunch of fresh dill

1. Dry roast the mustard seeds, until fragrant and popping. Cool, and crush together with the peppercorns with pestle and mortar. Mix together with salt, sugar and finely chopped dill.

2. Place a large piece of cling film to cover the dish you’re using for your curing. Place half of the raw, grated beetroot at the bottom. Then add half of the mixture of the other ingredients.

3. Add the piece of salmon on top of the beetroot and sugar / salt mixture. Leave the skin on the fish.

img_1635

4. Add the salt / sugar mixture and the beetroot on top of the fish too.

5. Tightly pack the fish and curing mixture. I used three different layers of cling film, however some of the liquid will still seep through. Place something to act as weights on top of the fish, and put in to fridge.

5. About every 12 hours (or every morning and evening), turn the fish upside down. I also change the direction my weights are, to try to ensure they are covering as much as possible during the process.

img_1640

6. After two days, your fish is ready. Drain all liquid, and wipe the fish piece clean.

img_1648